I started out with a Blogger blog and still have it up just in case my readers think that I am still there so I created an image to make it pop. I wanted to show you how to install a Favicon on your blogger blog.
What’s a Favicon? It’s not a leprechaun, it’s a Favicon.
A Favicon is a 32x 32 or 16×16 pixel image that people see when they look at your browser tab. It is a sexy way of branding your blog with a image tab that best represents it. This is a form of branding so when people search for your blog and click to open it they will see your Favicon in the web browser.
The steps are not hard to complete, so lets get started.
Step 1:
– If you have an image that you want to use for the Favicon, make sure you save it as a gif or png file.
– If you do not have an image, one of the easiest ways to create one is to go to the Favicon.ico Generator
Step 2:
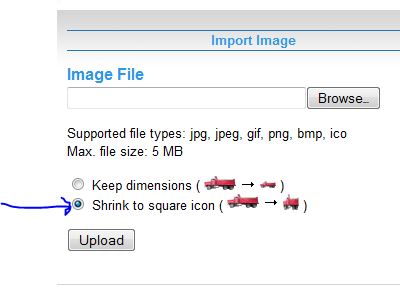
– Import a picture and select shrink to square box
– Click upload.
After it uploads you can color the Favicon a different color if you choose and click download afterward or click download and save it to your desktop. The Favicon file saved to your computer is an .ico file and blogger doesn’t support that type of file. You will have to save it as a gif or png file on your desktop.
Step 3 – Please go to IconJ.
Click on Hosting and Generator tab.
Click on Anonymous Favicon Hosting that goes to Free Favicon Hosting page.
You do not have to sign up for anything, it’s free hosting. If you would like to register an account for free at IconJ you can but I wanted you to know that you don’t have to.
Whew! back to the directions…
Click browse to get your gif or png file off of your desktop, after that upload it.
You will need to host the picture and you can host it for free also on IconJ.
Step 4 – Click on Anonymous hosting and you will come to this page Free Favicon Hosting (this sounds like a celebration!)
On the Free Favicon Hosting page, you will click on browse and select the gif favicon file that saved on your computer and then click upload.
Then you will come to this screen
![]() Step 5
Step 5
Now please go to your blogger dashboard
Click on Design
Click on Edit HTML
This will take you to your template HTML coding page
Please backup your template just in case so you have an extra copy of your template. The backup copy will allow you to re-upload the template in case you have any issues or problems. I will say again I recommend this before proceeding.
In the HTML coding please look for

Please make sure you copy your link right in between <title>… and the <b:skin…. like how you see pictured.
After that click save template. Refresh your browser and view your blog and your awesome, jazzy Favicon appears.
Creating a Favicon through blogger is not hard but it’s a few more steps than through WordPress.
If you have a self hosted blog please check out my post on “How to Create a Favicon for a WordPress Self-hosted blog.”
Disclaimer
The following steps worked well for my blogger blog and the directions worked for me.


This tutorial was fantastic. I have been meaning to add a favicon to my bog for a while now so this really helped. 🙂 I’m your newest follower now.
Look forward to hearing from you
Love
Tashrin – A Toronto based personal style blog
Hi Tashrin,
I try to explain as detailed as I can because I know when I want to learn how to do certain applications it makes it so great if the steps are spelled out.
Awesome! Thanks for the follow, I appreciate that so much.